
Tracks area
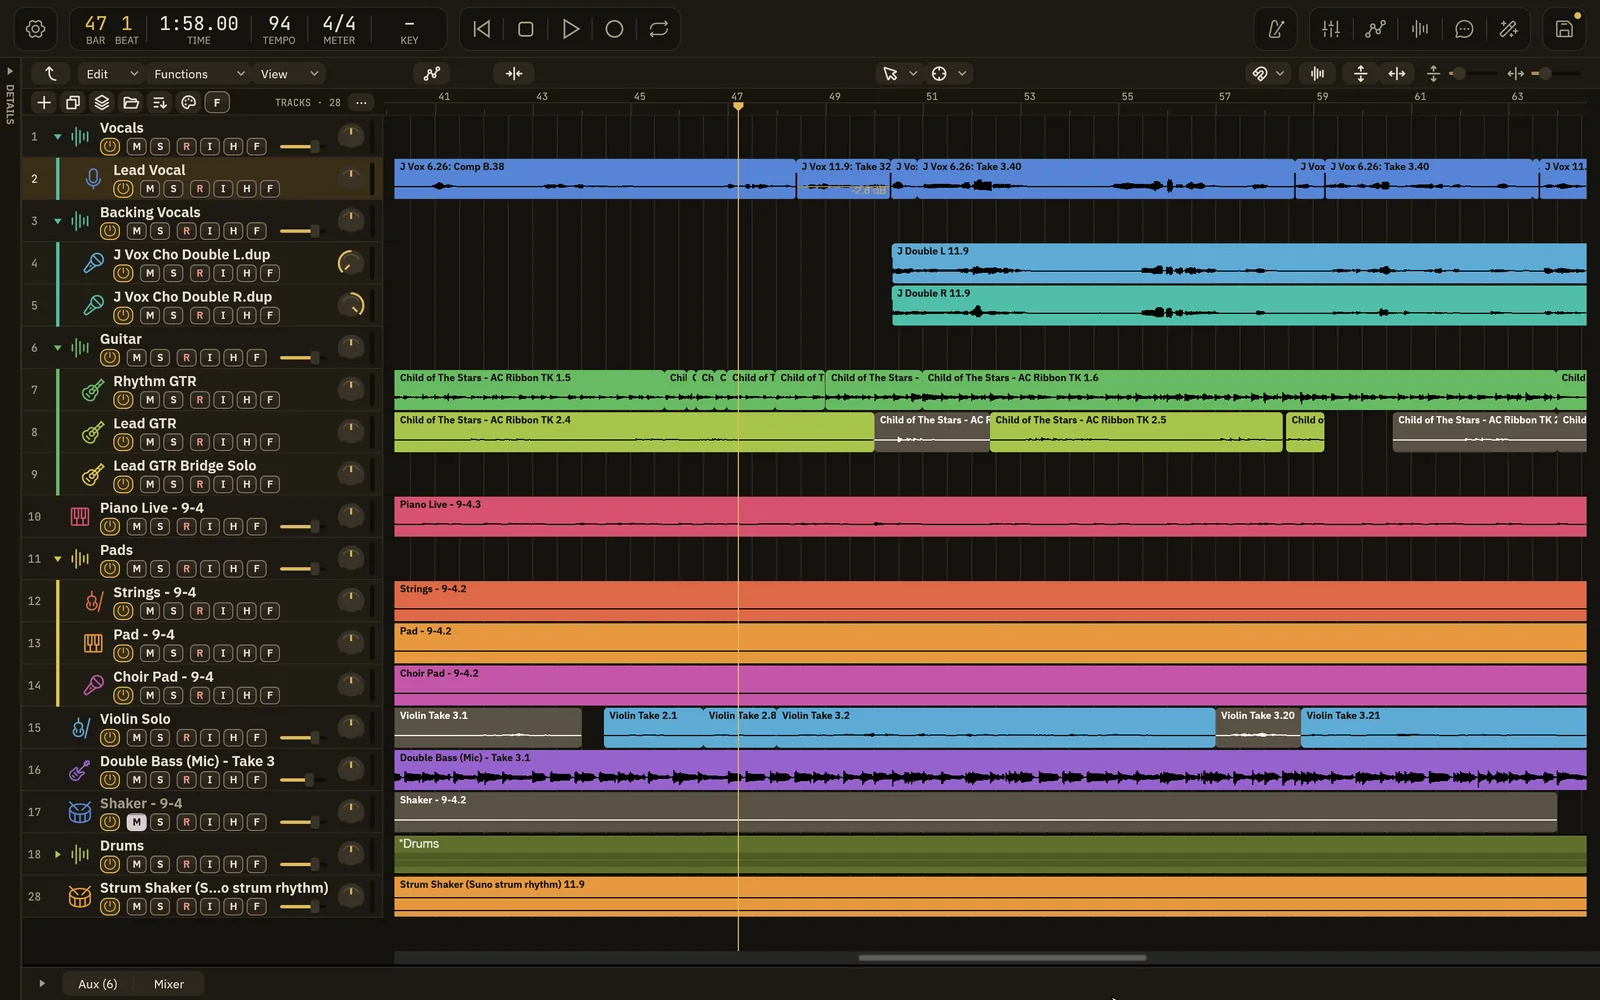
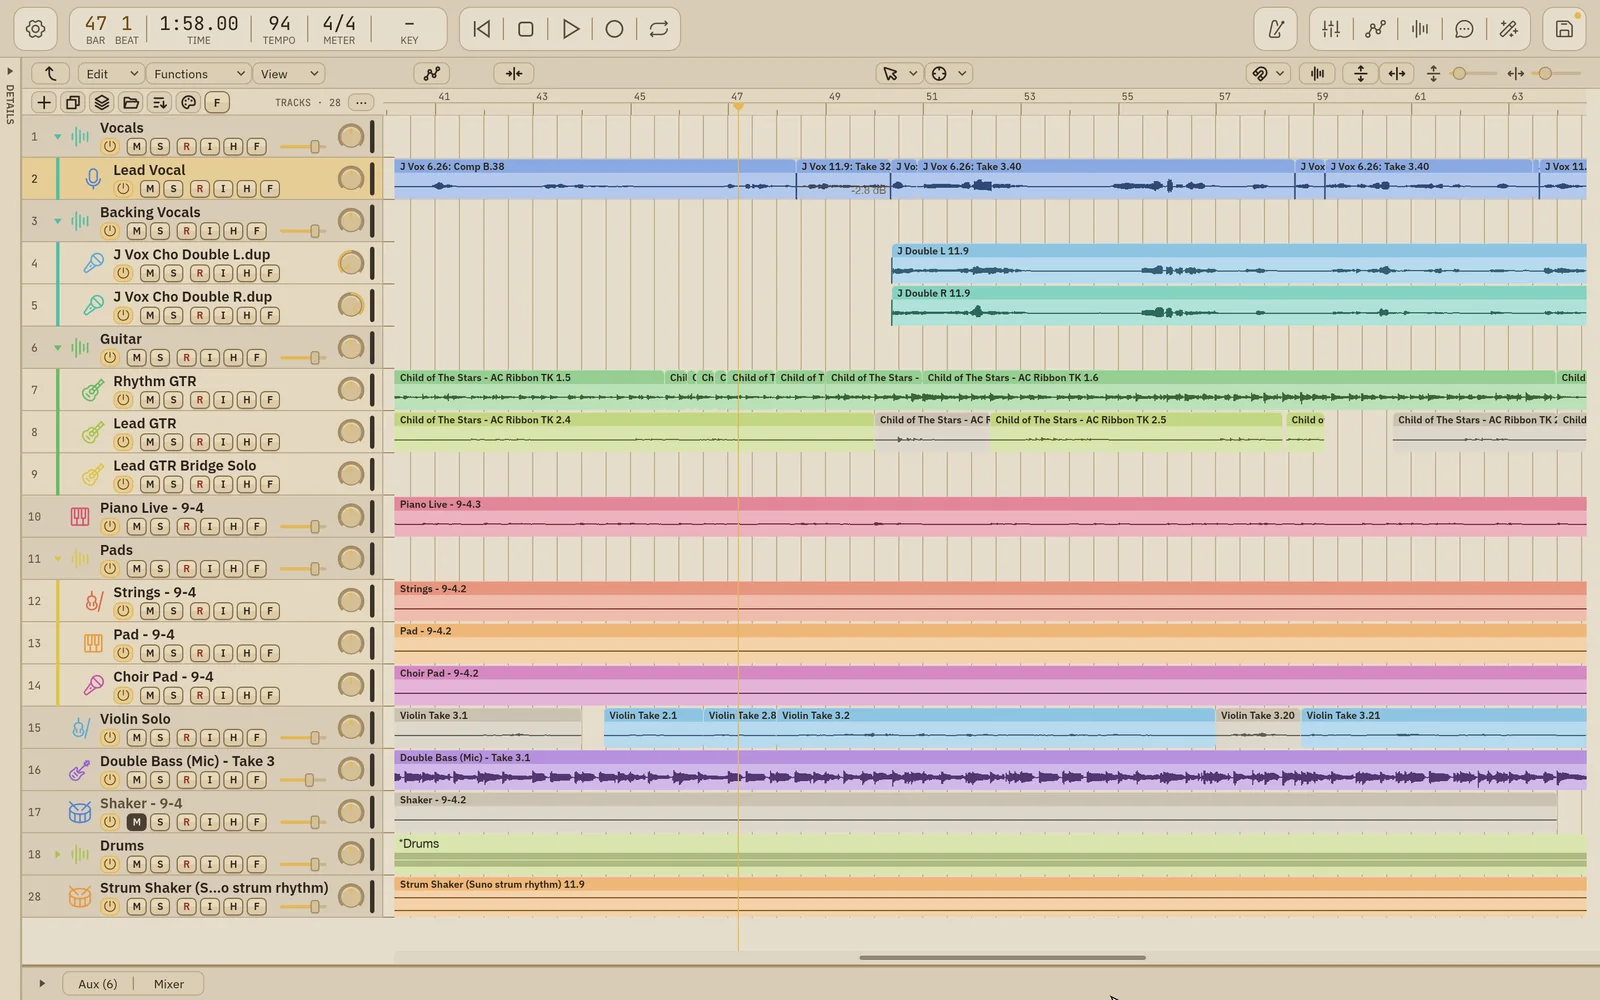
The tracks area in the center of the window shows your tracks top to bottom and the song’s timeline left to right. From top to bottom, it has a tools row, the ruler and the tracks. The track headers run down the left side.
Tools row
Section titled “Tools row”From left to right:
- Return to Start moves the playhead to the beginning.
- Edit has Undo, Redo, Cut, Copy and Paste.
- Functions has Group Settings, Convert Loops to Real Copies (⌃L), AI Mix…, and the timing helpers Tighten Vocal Timing…, Tighten Drum Timing… and Measure Drum Timing…, which open the AI Assistant.
- View turns parts of the window on and off: Details, Mixer, Aux Area, Automation, AI Mix, Catch Playhead, Waveform Zoom, Vertical Auto Zoom, Arrangement Track and AI Mix Reference Sections. It also has Waveform Magnification.
- Automation (A) shows or hides automation lanes.
- Catch Playhead scrolls the view to follow the playhead during playback.
- Left Click Tool and Command-Click Tool pick the two tools you edit with. See Tools.
- Snap and Drag set how regions move. See Snap and Drag.
- Waveform Zoom, Vertical Auto Zoom, Horizontal Zoom to Fit Project, and the Vertical Zoom and Horizontal Zoom sliders. See Zoom.
In a narrow window, some of these fold into the Edit menu or a combined Snap and Drag menu.
Pick the tool for a plain click from Left Click Tool, and the tool you get while holding ⌘ from Command-Click Tool:
| Tool | Use it to |
|---|---|
| Pointer Tool | Select, move and trim regions. |
| Pencil Tool | Draw automation. |
| Scissors Tool | Split regions. See Scissors. |
| Zoom Tool | Drag a box to zoom into it. |
| Marquee Tool | Select a range of time across tracks. |
| Trim Tool | Trim region edges. |
| Scrub Tool | Scrub through the audio. |
| Hand Tool | Move regions. |
Hold ⌃⌥ over the timeline to zoom with a box, whichever tool is selected. Drag a box around what you want to see. Click without dragging to step back to the previous zoom.
Snap and Drag
Section titled “Snap and Drag”Snap sets the grid that moves and edits lock to: Smart, Off, Bar, Beat, Division or 1/16 Note. Smart picks a grid that suits the current zoom.
Drag sets what happens when a region overlaps another:
- Overlap keeps both regions.
- Replace cuts away the part of the other region underneath.
- X-Fade keeps both and adds a crossfade across the overlap.
- ⌘-scroll zooms the timeline. Scroll moves up and down. ⇧-scroll moves left and right.
- The Horizontal Zoom and Vertical Zoom sliders change the timeline zoom and the track height. Click away from a slider’s thumb to zoom one step that way.
- Horizontal Zoom to Fit Project shows the whole song.
- Vertical Auto Zoom fits the tracks into the window’s height.
- Waveform Zoom makes the vertical slider enlarge the waveforms instead of the tracks.
Zooming never changes the song or adds undo steps.
Track list header
Section titled “Track list header”Above the track headers is a bar with TRACKS and the number of tracks, and these buttons:
| Button | What it does |
|---|---|
| + | Adds a new audio track. |
| Duplicate | Duplicates the selected tracks. |
| Open / Close All Stacks | Opens or closes every stack at once. Shown when the song has stacks. |
| Sort Tracks | Orders the tracks: vocals, bass, drums, percussion, keys, synth, guitar, strings and so on. |
| Color by Instrument | Colors each track by its instrument. |
| Create Track Stack | Create Summing Stack or Create Folder Stack from the selected tracks. |
| H | Shows hidden tracks, or hides them again. |
| F | Focus: shows only the tracks marked F, or the selected tracks. Click again to show every track. |
| S | Shown while any track is soloed. Click to turn off every solo. |
| ··· | The Track List menu, with the same commands and Track Header Components. |
Track headers
Section titled “Track headers”Each track’s header shows, from left to right: its number, its icon in the track color, its name with a row of buttons under it, a volume slider, a pan knob and a level meter.
| Button | Name | What it does |
|---|---|---|
| Power | Track On/Off | Turns the track on or off. |
| M | Mute | Mutes the track. |
| S | Solo | Solos the track. |
| R | Record Enable | Arms the track for recording. |
| I | Input Monitoring | Lets you hear the track’s input. |
| H | Hide | Marks the track hidden. Click H in the list header to hide or show hidden tracks. |
| F | Focus | Marks the track for Focus. |
Drag across several M, S, R or I buttons to set them all at once.
- Click a name to select the track. Double-click it to rename the track.
- Click the icon to choose a different one.
- Drag the volume slider. Double-click it to type a volume. ⌥-click it to reset to 0 dB.
- Drag the pan knob. ⌥-click to center it.
- Right-click a header for more: Rename…, Duplicate…, Delete, Track Color, Track Icon, Track Height, Make Inactive, Create Summing Stack, Create Folder Stack, Open in Compadre and others.
Track Header Components
Section titled “Track Header Components”Right-click the track headers’ column, or open the ··· menu, and choose Track Header Components to pick which parts every header shows: Track On/Off, Mute · Solo, Record · Input Monitoring, Hide · Focus, Volume slider, Pan, Level meter (4 pt) and Track number. All are on by default. The choice applies to every track and every song.
Stacks
Section titled “Stacks”A Summing Stack sums its tracks into one channel, so you can process and set the level of a whole section at once, such as all the drums or all the backing vocals. A Folder Stack only groups tracks so you can open and close them together.
To make one, select the tracks and click Create Track Stack in the list header, or right-click a header and choose Create Summing Stack or Create Folder Stack.
- A stack’s main track has a small triangle in the stack’s color. Click it to show or hide the stack’s tracks. ⌥-click it to open or close every stack.
- The tracks inside a stack are indented, with a colored line down their left side.
- Right-click a track and choose Remove from Stack to take it out.
Opening and closing stacks is part of the view. It is not an undo step.
Regions
Section titled “Regions”Regions are the blocks of audio on each track. Click one to select it and edit its settings in the Details panel. Drag it to move it, or drag its edges to trim it.
For editing, see Scissors, Fades and crossfades, Quantize and Phrases.
Drag audio files from Finder onto a track to add them at that spot, snapped to the grid.
Arrangement
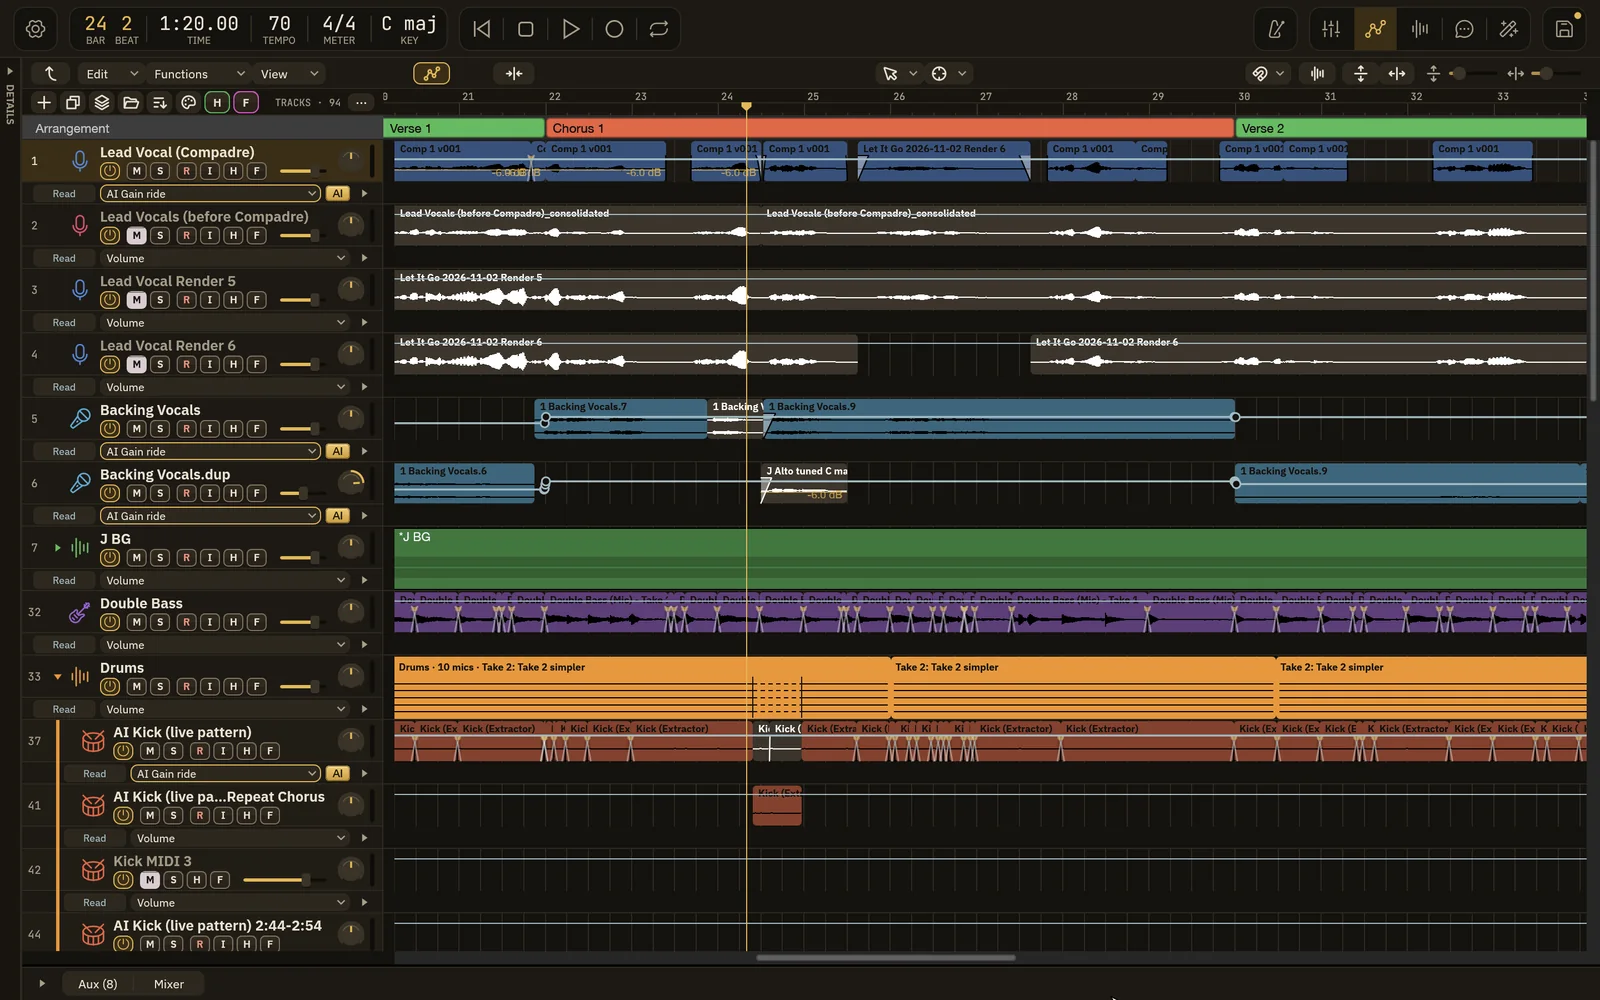
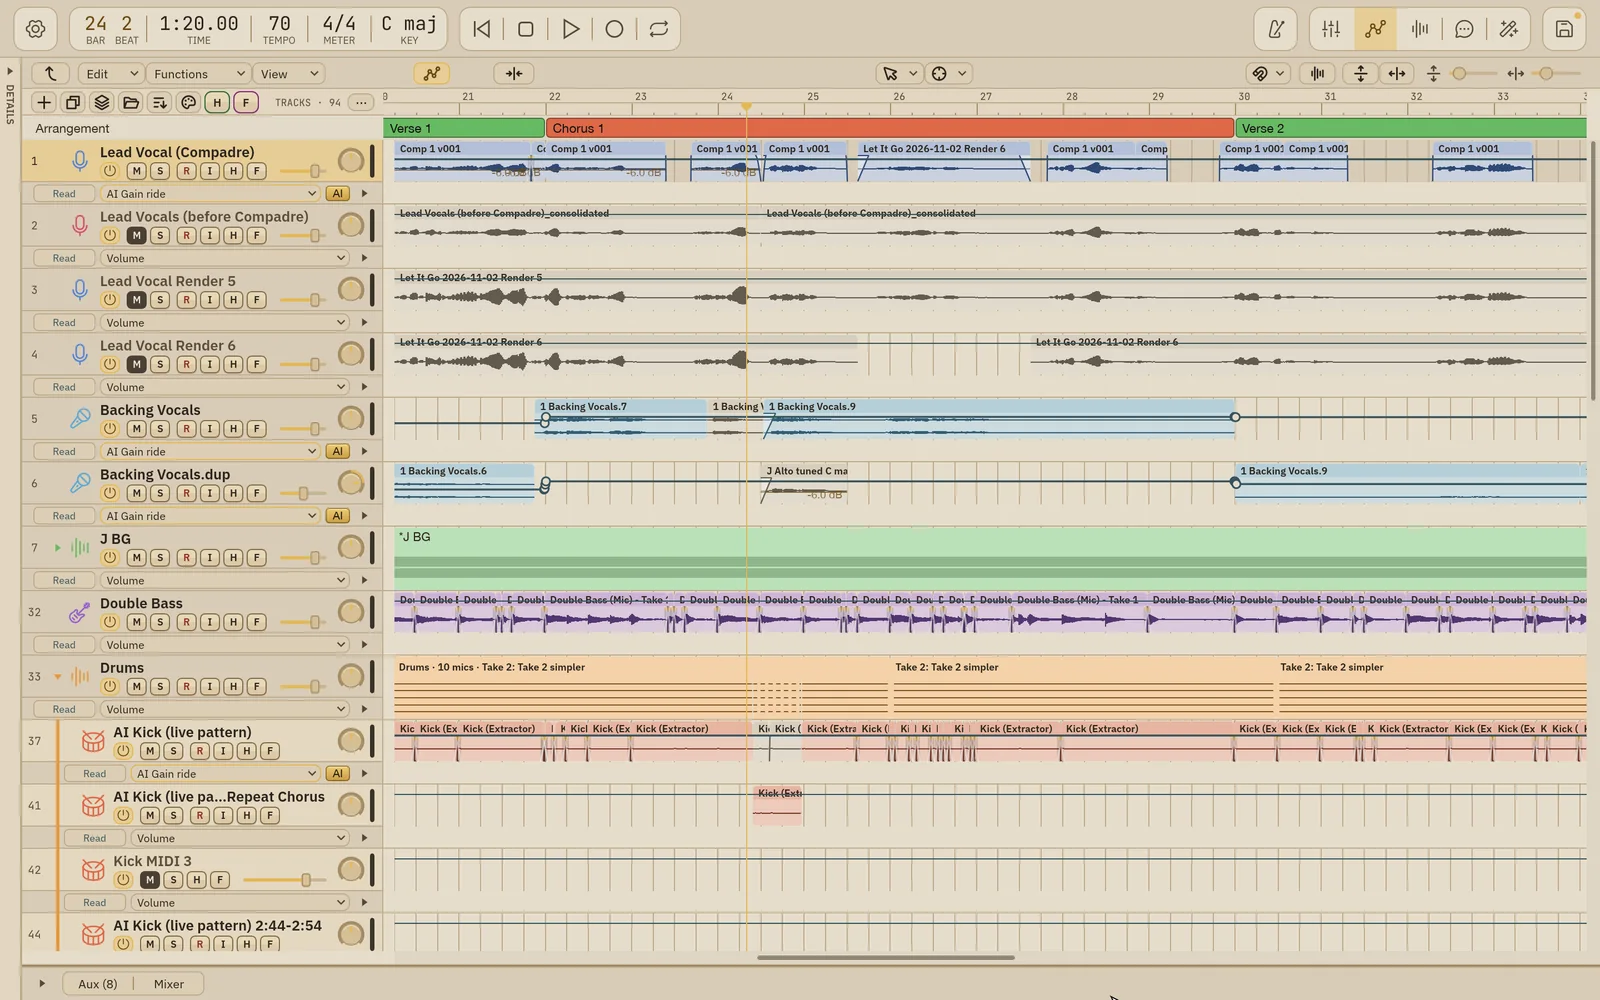
Section titled “Arrangement”The Arrangement lane under the ruler shows the song’s sections, such as Intro, Verse 1 and Chorus. Turn it on or off with View › Arrangement Track.
- Click + after the last section to add the next one, eight bars long.
- Right-click a section to Rename… or Delete it.
- Import Sections from Audio Files reads section markers that Logic Pro wrote into the song’s recorded audio files.
AI Mix uses these sections to compare your mix to a reference part by part.
Automation
Section titled “Automation”Press A, or click Automation in the header, to show automation lanes under each track. Draw on a lane with the Pencil Tool. Each channel strip’s automation mode sets whether the lane plays back or records your moves. See Mixer.
Logic Pro is a trademark of Apple Inc., registered in the U.S. and other countries. Wisdom Pro is not affiliated with or endorsed by Apple.
Built so far:1,292 hours24.1 billion tokensabout $8,700 at API pricesupdated Nov 21, 2026 What these numbers mean